Navigation Controller Has Two View Controllers Move Back and Forth
Using The Navigation Bar Title and Back Button in Swift 3.0

In writing the Swift Swift View Controllers book, it came to my attention many people don't understand the functionality of the navigation toolbar's title and Back button. In an early part of writing, I planned to skip the topic as a minor detail so I could get the book done and published. However, the built-in features of the navigation toolbar make it a powerful and useful feature that can't be missed.
Setting Up the Storyboard
Open up a new single view project named NavBarDemo using Swift as the language and Universal device. Go to the storyboard and click the view controller icon in the scene. In the drop down menu, select Editor>Embed in>Navigation controller. Drag two buttons, one labeled Pizza and the other labeled Pasta out to the scene. Set the font size on both to 26 Point.Make the Pizza button White(#FFFFFF) text on a Red(#FF0000) background. Make the Pasta button White(#FFFFFF) text on a Blue(#0000FF) background. Arrange them like this on the storyboard:

Select the Pizza button. Click the auto layout pin button  . Pin the Pizza button 0 points up, 0 left, 0 right, and 0 down like this:

Add the four constraints without updating. Select the Pasta button. Click the pin button and repeat the constraints of 0 up, 0 left, 0 right, and 0 down. Add the four constraints. Now Control-drag from the Pizza button to the Pasta button. Select Equal Widths in the menu that appears.

On the auto layout resolver menu  , select Update Frame in the All Frames in View section.

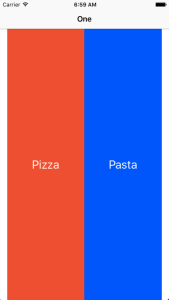
Your controller should look like this:

Drag two more view controllers on to the storyboard. Make the background of one Blue(#0000FF) and the background of the other Red(#FF0000).
Control drag from the Pizza button to the red scene. Select a show segue.

In the attributes inspector, set the segue identifier to pizza. Control-drag from the Pasta button to the blue scene. Select a show segue. In the properties inspector, set the segue identifier to pasta. Your storyboard should look like this:

In this lesson we will do all the coding in ViewController, so there is no need of code in the two new controllers.
Setting the Navigation Title Bar
There is a property on UIViewController called navigationItem. When used with navigation controllers, this controls the navigation bar at the top of the view. The navigationItem property is an instance of UINavigationItem, which has four major properties: a title, a left bar button, a right bar button and a prompt. To set the title on the toolbar , you set the string for the title property. For example add this to the ViewController class
override func viewWillAppear(_ animated: Bool) { navigationItem.title = "One" } Build and run. The root view now has One as a title.
We used viewWillAppear and not viewDidLoad. ViewController is the root view controller in the navigation stack. It only loads once and stays active in the background. It will execute viewDidload only once. To make sure we update, we use viewWillAppear instead.
The title is dynamic. As a simple example, We'll place a count in the title of the navigation bar. Add the following code:
var vcCount:Int = 0{ didSet{ navigationItem.title = "Count: \(vcCount)" } } We used the didSet property observer feature of Swift. Any time vcCount changes, the title changes with it. We change the count on any segue so we can increment in prepare for segue:. Add this:
override func prepare(for segue: UIStoryboardSegue, sender: AnyObject?) { vcCount+=1 } It's rare to not have a statement within an if clause in a prepare for segue:. We want any segue to increment the count, so we don't need the if.
We want to show the count when we load. Change the viewWillAppear to this:
override func viewWillAppear(_ animated: Bool) { // navigationItem.title = "One" navigationItem.title = "Count: \(vcCount)" } Build and run. Go back and forth in the views. The title changes every time you come back to it.

Programming the Back Button
You'll notice once you have a title, the navigation Back button disappears, to be replaced by the previous view's title.

The Back button reads the controller underneath the current controller for its title. You cannot set the back button title directly. Instead, you set the title of the current controller before you leave for the destination controller. If the previous view controller's title is nil, the button titles itself Back. Change theprepare for segue: to this:
override func prepare(for segue: UIStoryboardSegue, sender: AnyObject?) { vcCount += 1 navigationItem.title = nil } Build and run.
You have the count on the root controller

You have a Back button on the child controllers

If you wanted to add your own text to the Back button, you have to change the title of the controller directly under it on the navigation stack. The simplest way is change the title just before you segue to the new controller. Change prepare for segue: to this:
override func prepare(for segue: UIStoryboardSegue, sender: AnyObject?) { vcCount += 1 navigationItem.title = nil if segue.identifier == "pizza"{ navigationItem.title ="Pizza to One" } if segue.identifier == "pasta"{ navigationItem.title = "Pasta to One" } } Before we segue to the pizza and pasta controller, we change the title of the current controller's navigationItem. The Back button reads the title of navigationItem and sets the button's title accordingly. The viewWillAppear method will reset the title to the count in the first view controller when we pop the Pizza or Pasta view controller. Build and Run. Select to the Pizza and Pasta buttons:


To see this happening, you can comment out this in viewWillAppear.
//navigationItem.title = "Count: \(vcCount)"
Build and Run. When you go back, the title remains:

Uncomment the line before you go on.
The Size Sensitive Back Button
The Back button is sensitive to the space around it. The button's title responds to not having enough space to place itself. Changeprepare for segue: to this:
override func prepare(for segue: UIStoryboardSegue, sender: AnyObject?) { vcCount += 1 navigationItem.title = nil if segue.identifier == "pizza"{ let vc = segue.destinationViewController as UIViewController vc.navigationItem.title = "View Controller Pizza One" navigationItem.title = "Pizza to One" } if segue.identifier == "pasta"{ let vc = segue.destinationViewController as UIViewController vc.navigationItem.title = "View Controller Linguine all'arrabbiata" navigationItem.title = "Pasta to One" } } We get the destination view controller and assign it to vc. We then send the title for the destination view controller tovc.navigationItem.title. We've picked some long labels to test size restrictions.
Set the simulator to iPad Air 2. Build and run. Select the Pizza button.
![]()
Go back to select the Pasta button.
![]()
That works as we expected. Now try an iPhone 6 in the simulator. Run the demo, select the Pasta controller and you get this:

The navigation controller title gets replaced with Back. Go back and try the Pasta Button.

There is only the![]() icon and no text for the back button. Rotate the device by pressing Command-Left Arrow:
icon and no text for the back button. Rotate the device by pressing Command-Left Arrow:
![]()
The text re-appears with more space to place the text.
The back button is intelligent. If it has enough space, it displays the title of the previous controller. If there is not enough space, it displays Back. If there is not enough space for the word Back, it displays only the![]() icon.
icon.
There is an important design rule in play here that I am intentionally breaking to make the point: Keep your titles short in a navigation bar. If you keep titles short, you will have the full functionality of the back button.
The Whole Code
ViewController.swift
// // ViewController.swift // NavBarDemo for Swift 3.0 // // Created by Steven Lipton on 6/22/16. // Copyright © 2016 Steven Lipton. All rights reserved. // import UIKit class ViewController: UIViewController { var vcCount:Int = 0{ didSet{ navigationItem.title = "Count: \(vcCount)" } } override func viewWillAppear(_ animated: Bool) { //navigationItem.title = "One" navigationItem.title = "Count: \(vcCount)" } override func viewDidLoad() { super.viewDidLoad() // Do any additional setup after loading the view, typically from a nib. } override func prepare(for segue: UIStoryboardSegue, sender: AnyObject?) { vcCount += 1 navigationItem.title = nil if segue.identifier == "pizza"{ let vc = segue.destinationViewController as UIViewController vc.navigationItem.title = "View Controller Pizza One" navigationItem.title = "Pizza to One" } if segue.identifier == "pasta"{ let vc = segue.destinationViewController as UIViewController vc.navigationItem.title = "View Controller Linguine all'arrabbiata" navigationItem.title = "Pasta to One" } } override func didReceiveMemoryWarning() { super.didReceiveMemoryWarning() // Dispose of any resources that can be recreated. } } Category: GUI, Swift Programming, TutorialTags: back button, navigation bar, navigation controller, navigation title, navigation title bar, navigationItem, swift, Swift 3.0, text on back button, title on back button, UINavigationItem, Xcode, Xcode 8, Xcode swift
Navigation Controller Has Two View Controllers Move Back and Forth
Source: https://makeapppie.com/2016/06/22/using-the-navigation-bar-title-and-back-button-in-swift-3-0/